mongosh — every command below
builds on that setup.
Part 1: What Is Sharding?
Sharding is MongoDB's method of distributing a single collection's documents across multiple servers (shards). It is how MongoDB scales horizontally: instead of buying one bigger machine (vertical scaling), you add more machines, and each one stores only a portion of the data. This is the "distributed document database" feature that sets MongoDB apart for big data workloads.
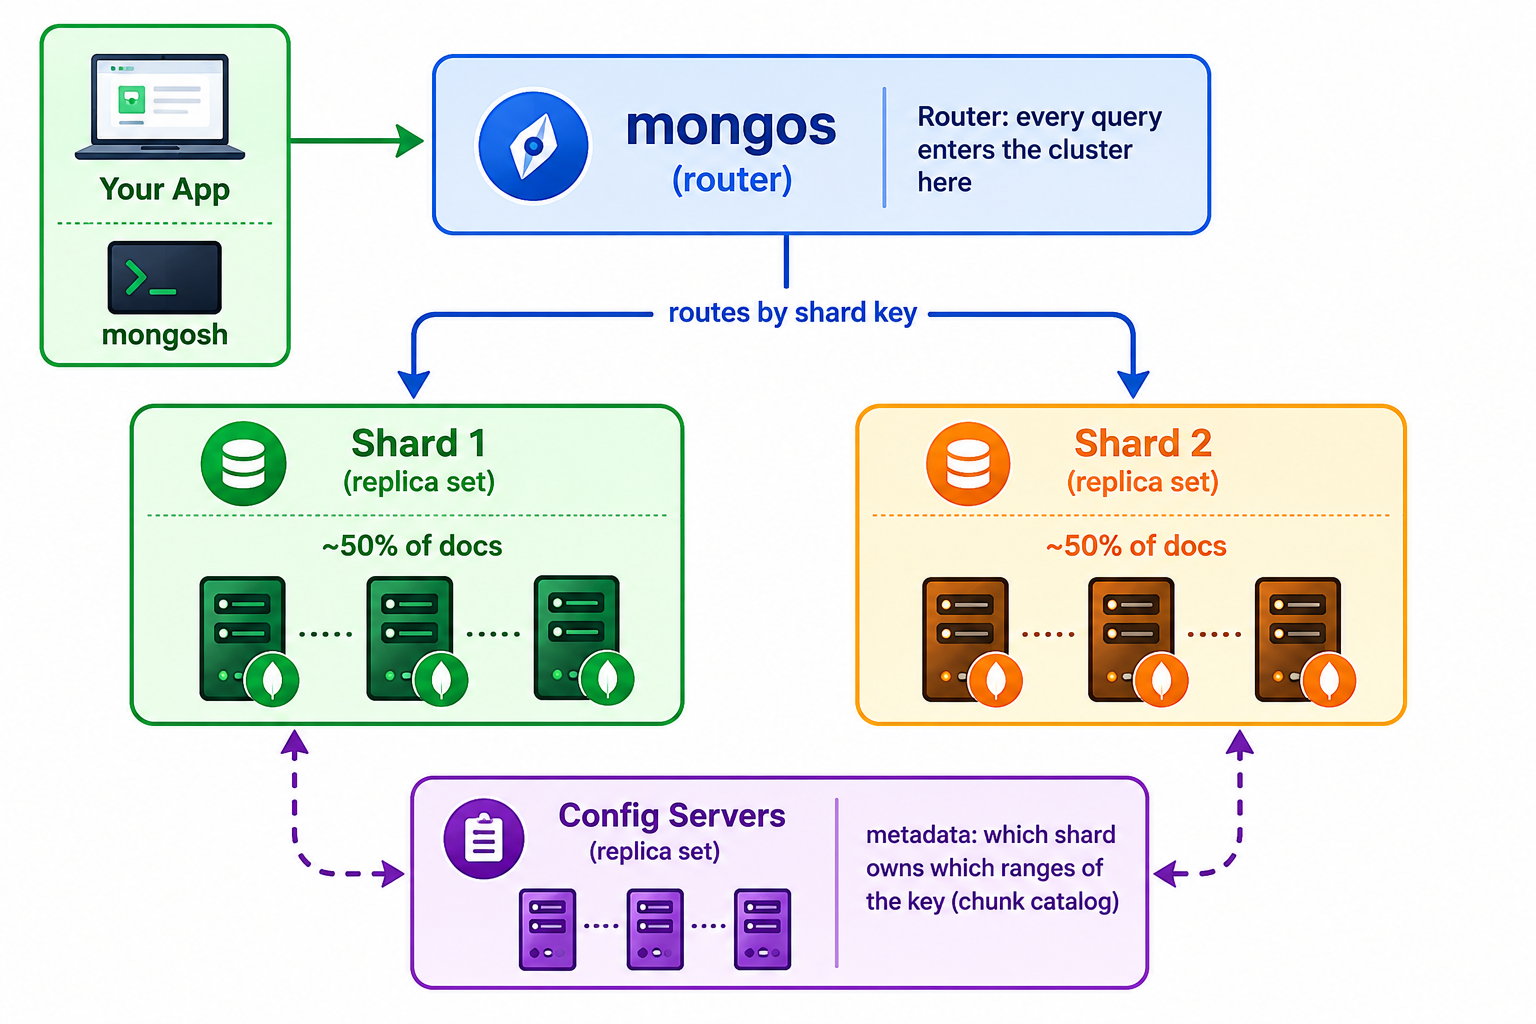
| Component | Role in the Cluster |
|---|---|
| Shards | Replica sets that each store a subset of the collection's documents. Data is split into chunks (ranges of the shard key) and spread across shards. |
| Config servers | A dedicated replica set storing the cluster's metadata: which shard owns which chunk, and the cluster's topology. |
| mongos (router) | The entry point for all applications. It reads the config metadata and forwards each query only to the shard(s) that can hold the answer. |
Choosing a Shard Key: Ranged vs Hashed
Ranged Shard Key
Chunks own contiguous ranges of the
key (e.g. customer_id from "a" to "m").
- Efficient range queries (target 1-2 shards)
- Risk: monotonically increasing keys (dates, ObjectIds) send all inserts to one shard — a hotspot
Hashed Shard Key
Chunks own ranges of a hash of the field's value, so similar values land on different shards.
- Even write distribution — no insert hotspots
- Range queries become scatter-gather (all shards queried)
- Best all-round default for uniform workloads
Part 2: Prepare Sharded Cluster with Docker
We'll run the whole cluster on one machine: 1 config server, 2 shards (each a single-node replica set), and 1 mongos router. No compose file ships with this tutorial — you write it yourself in this part, so you know exactly what every line does before any container starts.
-
Free the port — stop the standalone container
docker compose down -
Write the compose file — 4 services + 3 volumes
docker-compose.sharded.yml -
Launch the shards (and the router) in the background
docker compose -f docker-compose.sharded.yml up -d -
Confirm all four containers are
Updocker compose -f docker-compose.sharded.yml ps -
Containers running is not a cluster yet — Part 3 initiates the replica sets and registers the shards.
Step 1: Stop the Standalone Container (Avoids a Port Conflict)
The mongos router maps to host port 27025, so both stacks
can coexist — but to keep things simple, stop the single-node stack from earlier
tutorials while you work on this one:
# From the project root (stops the mongodb container from Tutorial 1)
docker compose down

# Verify it is gone
docker ps --filter name=mongodbStep 2: Create the Compose File
Create the orchestration file in the
project root — the same folder that holds the docker-compose.yml from
Tutorial 1, not the docs/ folder. Open it
with nano (exactly
as in Tutorial 1) and paste the contents below:
# Go to the project root first
cd big-data-analysis-with-mogodb   # or your own project folder
pwd

# Create the orchestration file
nano docker-compose.sharded.yml- Paste content: Right-click inside the nano window and select Paste, or press Ctrl+Shift+V (or Shift+Insert).
- Save the file: Press Ctrl+O (Write Out), press Enter to confirm the filename.
- Exit nano: Press Ctrl+X. If asked to save changes, press Y then Enter.
docker-compose.sharded.yml:
# Tutorial 4: MongoDB Sharded Cluster for local labs
# 1 config server replica set + 2 shard replica sets + 1 mongos router.
# NOTE: single-node replica sets are fine for learning, never for production.
#
#   docker compose -f docker-compose.sharded.yml up -d
#
services:
  # ---- Config Server Replica Set (cluster metadata) ----
  cfg:
    image: mongo:7
    container_name: cfg
    restart: unless-stopped
    command: ["mongod", "--configsvr", "--replSet", "cfgRS", "--port", "27019", "--bind_ip_all"]
    ports:
      - "27019:27019"
    volumes:
      - cfg_data:/data/db

  # ---- Shard 1 Replica Set ----
  shard1:
    image: mongo:7
    container_name: shard1
    restart: unless-stopped
    command: ["mongod", "--shardsvr", "--replSet", "shard1RS", "--port", "27018", "--bind_ip_all"]
    ports:
      - "27101:27018"
    volumes:
      - shard1_data:/data/db

  # ---- Shard 2 Replica Set ----
  shard2:
    image: mongo:7
    container_name: shard2
    restart: unless-stopped
    command: ["mongod", "--shardsvr", "--replSet", "shard2RS", "--port", "27018", "--bind_ip_all"]
    ports:
      - "27102:27018"
    volumes:
      - shard2_data:/data/db

  # ---- Router (mongos) ----
  mongos:
    image: mongo:7
    container_name: mongos
    restart: unless-stopped
    command: ["mongos", "--configdb", "cfgRS/cfg:27019", "--port", "27017", "--bind_ip_all"]
    ports:
      - "27025:27017"
    depends_on:
      - cfg
      - shard1
      - shard2

volumes:
  cfg_data:
  shard1_data:
shard2_data:Back in the terminal, let Docker parse the file you
just saved. The config command is a
dry run: it prints what Docker understood without starting anything, so a typo shows up
here instead of as a cryptic error later.
# 1. Confirm nano wrote the file where Docker will look for it
pwd
ls docker-compose.sharded.yml

# 2. Dry-run it — Docker re-prints the config it parsed
docker compose -f docker-compose.sharded.yml config

# You should see the four services (cfg, shard1, shard2, mongos)
# and the three named volumes. An error here = invalid YAML, fix it first.Step 3: Read the File Structure (in Brief)
The file has just two top-level blocks. services: lists the four containers to run
— cfg, shard1, shard2 and mongos. volumes: declares the three named volumes
(cfg_data, shard1_data, shard2_data) that keep
each server's files across restarts. Every service repeats the same five keys, and those
keys are the whole story:
| Key | Purpose in this file |
|---|---|
| image | Which container image to run — mongo:7 for all four, so every component is the
same MongoDB 7 build. The role comes from the flags, not the image. |
| container_name | Pins the exact Docker name (cfg,
shard1, …). Without it Docker invents
prefixed names and docker exec cfg …
fails with "No such container". |
| command | The actual process. The mongod --configsvr / --shardsvr flags decide a server's role, --replSet names its replica set, and --bind_ip_all lets other containers reach it.
The router instead runs mongos --configdb.
|
| ports | Maps host:container. This is
how the router avoids clashing with Tutorial 1's standalone container on
host port 27017 (it takes 27025 instead). |
| volumes / depends_on | volumes persists
/data/db for the three data servers (the
router stores nothing, so it gets none). depends_on simply starts the router after
them — it does not wait for anything to be healthy. |
| Service | What It Is & How To Reach It |
|---|---|
| cfg | Config server (--configsvr,
replica set cfgRS). Stores chunk metadata
only — no
application data. Host port 27019; data kept
in volume cfg_data. |
| shard1 / shard2 | Shard servers (--shardsvr,
replica sets shard1RS / shard2RS). Each holds a subset of the
collection's documents. Mapped to host ports 27101 / 27102;
data kept in shard1_data / shard2_data. |
| mongos | Router (--configdb
cfgRS/cfg:27019). Stateless entry point — connect here on host
port 27025. Needs no volume; depends_on just controls startup order, it
does not wait for replica sets to be initiated. |
--configsvr marks a node as
a config server, --shardsvr marks it as a shard, and
--replSet makes it a replica-set member. A router
is stateless — mongos holds no data, so it
needs no volume. container_name pins the exact
Docker name (cfg, shard1, …) — without it Docker generates prefixed names
like sharding-lab-cfg-1 and plain docker exec cfg … fails with "No such container".
| Service | Inside the container (use with compose exec) |
From your host machine (laptop, Compass, drivers) |
|---|---|---|
| cfg | 27019 | 27019 |
| shard1 | 27018 | 27101 |
| shard2 | 27018 | 27102 |
| mongos | 27017 | 27025 |
- Inside a container? You used
docker compose … exec→ use the container port. - On your laptop? Compass, drivers, or a local
mongosh→ use the host port. - Container ports: mongos
27017, a shard27018, cfg27019. - Host port for the router:
localhost:27025— not 27017. - Why 27025? Host port 27017 is still taken by Tutorial 1's standalone container.
- Why can both shards use 27018? Each container has its own network namespace, so its ports are private to it.
- What about
shard1:27018? An internal Docker address. It works only between containers, never from your laptop.
Step 4: Launch the Cluster
The file you just wrote is now the whole cluster
definition, so one command starts all four containers in the background
(-d = detached).
# 1. From the project root (where you saved the file), start everything
docker compose -f docker-compose.sharded.yml up -d

# 2. Wait ~10 seconds, then confirm all four containers are Up
docker compose -f docker-compose.sharded.yml ps
docker ps --format "table {{.Names}}\t{{.Status}}\t{{.Ports}}" | grep -E "cfg|shard|mongos"

# 3. If one container is Restarting, its YAML line is wrong —
#    read its log and fix, then run the `up -d` command again:
# docker compose -f docker-compose.sharded.yml logs shard1cfg, shard1, shard2, and mongos, all with
status Up. Because your file sets container_name, they are named exactly cfg, shard1, shard2 and mongos — that
is what makes plain docker exec cfg … work in
Part 3. Do not continue to Part 3 until all four are Up.
cfg
container running,
no replica set
shard1
container running,
no replica set
shard2
container running,
no replica set
mongos
router up,
knows no shards
Four isolated MongoDB processes. None of them know the others
exist yet — this is the state sh.status() would refuse to even answer, because
there is no cluster.
idle — not in the cluster yet ready — configured and healthy
Part 3: Initiate Replica Sets & Register the Shards
Fresh containers are blank slates — each replica set must be initiated, and the router must be told which shards exist. This is a one-time setup per cluster.
Initiate All Three Replica Sets
Run these three rs.initiate() commands — one
for the config server, one for each shard. Each should return ok: 1:
# NOTE: `compose exec SERVICE ...` addresses the container by SERVICE name,
# so it works whether your containers are called `cfg` or `sharding-lab-cfg-1`.
# Run from the project root (where docker-compose.sharded.yml lives).

# 1. Initiate the config server replica set
docker compose -f docker-compose.sharded.yml exec cfg mongosh --port 27019 --quiet --eval \
  'rs.initiate({_id: "cfgRS", configsvr: true, members: [{_id: 0, host: "cfg:27019"}]})'

# 2. Initiate shard 1
docker compose -f docker-compose.sharded.yml exec shard1 mongosh --port 27018 --quiet --eval \
  'rs.initiate({_id: "shard1RS", members: [{_id: 0, host: "shard1:27018"}]})'

# 3. Initiate shard 2
docker compose -f docker-compose.sharded.yml exec shard2 mongosh --port 27018 --quiet --eval \
'rs.initiate({_id: "shard2RS", members: [{_id: 0, host: "shard2:27018"}]})'Register the Shards with the Router
Connect to mongos and add both shards to the cluster:
# Add shard 1
docker compose -f docker-compose.sharded.yml exec mongos mongosh --port 27017 --quiet --eval \
  'sh.addShard("shard1RS/shard1:27018")'

# Add shard 2
docker compose -f docker-compose.sharded.yml exec mongos mongosh --port 27017 --quiet --eval \
'sh.addShard("shard2RS/shard2:27018")'Verify the Cluster Topology
docker compose -f docker-compose.sharded.yml exec mongos mongosh --port 27017 --eval "sh.status()"shards section
lists shard1RS and shard2RS, each with state: 1
and a TOP (topology) showing a healthy primary.
cfg
cfgRS initiated,
PRIMARY, holds
metadata
shard1
shard1RS initiated,
PRIMARY,
empty
shard2
shard2RS initiated,
PRIMARY,
empty
mongos
registered both shards,
routing
active
This is the first real cluster: three replica sets
elected primaries, and the router finally knows both shards
(sh.addShard()). It is still an
empty cluster — no database, no collection, no documents.
Part 4: Enable Sharding & Pick a Shard Key
Sharding is applied per collection, not per server. We'll shard the Olist orders collection on a
hashed customer_id — every customer has a unique
ID (high cardinality), so hashing spreads inserts evenly across both shards.
Don't have the CSVs yet? Download the Olist dataset here
and place the files under data/olist_dataset/.
Connect to the Router & Create the Database
# All interaction from now on goes through the ROUTER, not the shards
docker compose -f docker-compose.sharded.yml exec mongos mongosh --port 27017Enable Sharding & Shard the Collection
admin/password), this sharded cluster is started
without access control — the compose file sets no credentials and no
--auth/--keyFile, so every
connection is fully privileged. That is deliberate to keep this local lab simple; a
production sharded cluster must always enable keyfile/x.509 auth.
// 1. Enable sharding for the database
sh.enableSharding("olist_sharded")

// 2. Shard the orders collection on a hashed customer_id.
//    MongoDB needs an index supporting the shard key —
//    creating it up front avoids an error on import.
use olist_sharded
db.orders.createIndex({ customer_id: "hashed" })

// 3. Declare the sharded collection
sh.shardCollection("olist_sharded.orders", { customer_id: "hashed" })

// 4. Confirm it is registered as sharded
db.orders.getShardDistribution()   // empty for now — no data yet
sh.status({ verbose: false })olist_sharded so the sharded copy lives beside — not on top
of — the olist_ecommerce data from Tutorial 3 (which
stayed on the standalone container).
cfg
now also stores the
chunk
catalog
shard1
owns a hash range
of
customer_id
shard2
owns the other
hash range
mongos
routes every write
to the right
shard
olist_sharded.orders —
declared sharded on { customer_id: "hashed" }.
0 documents — the range split exists
only as metadata until Part 5 imports the CSV.
Part 5: Load Data & Watch It Distribute
Time for the payoff: import the Olist orders through the router and watch the
~100K documents split across both shards automatically. No application code changes — mongoimport talks to
mongos exactly as it
would to any MongoDB server.
Step 1: Copy & Import via the Router
mongosh prompt from Part 4, type exit (or press Ctrl+D) to return to your regular shell — the commands
below are bash/Docker commands, not MongoDB shell commands, and will
error out inside mongosh.
# Copy the orders CSV into the mongos container
# (compose cp uses the SERVICE name, so it works with prefixed container names too)
docker compose -f docker-compose.sharded.yml cp data/olist_dataset/olist_orders_dataset.csv mongos:/tmp/orders.csv

# Import through the router — port 27025 on localhost
docker compose -f docker-compose.sharded.yml exec mongos mongoimport \
  --db olist_sharded \
  --collection orders \
  --type csv --headerline \
  --file /tmp/orders.csv \
--host localhost --port 27017Step 2: Inspect the Distribution
Step 1 left you in the regular terminal, so open the MongoDB shell on the router first — then run the inspection commands inside it:
docker compose -f docker-compose.sharded.yml exec mongos mongosh --port 27017use olist_sharded
// How many documents went to each shard?
db.orders.getShardDistribution()
// Total should match the standalone import (~99,441 orders)
db.orders.countDocuments()
// Confirm the collection reports itself as sharded
db.orders.stats().sharded // trueTypical output of getShardDistribution() —
roughly a 50/50 split because the shard key is hashed:
[direct: mongos] olist_sharded> db.orders.getShardDistribution()
Shard shard1RS at shard1RS/shard1:27018
{
  data: '19.16MiB',
  docs: 49858,
  chunks: 2,
  'estimated data per chunk': '9.58MiB',
  'estimated docs per chunk': 24929
}
---
Shard shard2RS at shard2RS/shard2:27018
{
  data: '19.05MiB',
  docs: 49583,
  chunks: 2,
  'estimated data per chunk': '9.52MiB',
  'estimated docs per chunk': 24791
}
---
Totals
{
  data: '38.22MiB',
  docs: 99441,
  chunks: 4,
  'Shard shard1RS': [
    '50.13 % data',
    '50.13 % docs in cluster',
    '403B avg obj size on shard'
  ],
  'Shard shard2RS': [
    '49.86 % data',
    '49.86 % docs in cluster',
    '403B avg obj size on shard'
  ]
}cfg
tracks 4 chunks
across 2 shards
shard1
49,858 docs
· 2 chunks
19.16 MiB
shard2
49,583 docs
· 2 chunks
19.05 MiB
mongos
sent every insert
to its owning
shard
mongoimport sent 99,441 documents
to the router only. The router hashed each
customer_id, looked up which chunk owned that hash in
the config server, and forwarded the write to that shard. Neither shard ever talked
to the other.
Step 3: Add a Third Shard & Watch Migration Optional standalone demo
Sharding's killer feature is elastic scaling: add capacity without downtime, and the balancer redistributes chunks automatically.
exit (or press Ctrl+D) to return to your regular shell first, then execute
the Docker commands below from the project root.
# 0. Find the Docker network YOUR cluster actually uses.
#    It is named after YOUR project folder (e.g. sharding-lab_default) —
#    do NOT hardcode big-data-analysis-with-mogodb_default unless that is your folder.
NET=$(docker inspect --format '{{range $k, $v := .NetworkSettings.Networks}}{{$k}}{{end}}' \
  $(docker compose -f docker-compose.sharded.yml ps -q mongos))
echo "Cluster network: $NET"

# 1. Start one more shard container attached to THAT network
docker run -d --name shard3 --network "$NET" \
  mongo:7 mongod --shardsvr --replSet shard3RS --port 27018 --bind_ip_all

# 2. Initiate its replica set
docker exec shard3 mongosh --port 27018 --quiet --eval \
  'rs.initiate({_id: "shard3RS", members: [{_id: 0, host: "shard3:27018"}]})'

# 2b. Wait until shard3 elects itself PRIMARY (must print 1) before registering it
sleep 5
docker exec shard3 mongosh --port 27018 --quiet --eval 'rs.status().myState'
# not 1 yet? wait a few seconds and repeat this line

# 3. Register it with the router — the balancer starts moving
#    chunks to the new shard automatically
docker compose -f docker-compose.sharded.yml exec mongos mongosh --port 27017 --quiet --eval \
  'sh.addShard("shard3RS/shard3:27018")'

# 4. Check the balance. Expectation check: our collection is only ~38 MiB in
#    total, so the gap between the fullest shard (19 MiB) and the empty one
#    (0 MiB) is ~19 MiB. The balancer treats a collection as balanced until
#    that gap reaches 3 x chunkSize (3 x 128 MB = 384 MB by default), so
#    shard3 stays EMPTY on its own — that is normal, not an error.
docker compose -f docker-compose.sharded.yml exec mongos mongosh --port 27017 --eval \
  'sh.status(); db.getSiblingDB("olist_sharded").orders.getShardDistribution()'
chunkSize is 128 MB, so a migration needs a
gap of 384 MB. Ours is 19 MB → the balancer correctly does
nothing, and shard3 stays empty. It also avoids
pointless churn: with only 4 chunks, handing one to a third shard would give
1–1–2 and then oscillate back.
Step 4: Confirm the Third Shard Was Added
A new shard that owns no chunks is
invisible in getShardDistribution()
— so use the two commands that report cluster
membership instead of data:
# 1. Cluster MEMBERSHIP — the authoritative list of shards.
#    This is the one that shows all three, even the empty one.
docker compose -f docker-compose.sharded.yml exec mongos mongosh --port 27017 --eval \
  'db.adminCommand({ listShards: 1 }).shards'

# 2. Same info, human-readable, with health state + balancer round
docker compose -f docker-compose.sharded.yml exec mongos mongosh --port 27017 --eval \
  'sh.status()'

# 3. DATA distribution — shard3RS is absent here, and that is expected:
#    it is registered, it just owns 0 chunks.
docker compose -f docker-compose.sharded.yml exec mongos mongosh --port 27017 --eval \
'db.getSiblingDB("olist_sharded").orders.getShardDistribution()'shard1RS, shard2RS and shard3RS —
each with state: 1. Command 3 still lists only
two. Membership ≠ data: a shard belongs to the cluster the
moment sh.addShard() succeeds, but it only appears in a
distribution report once the balancer (or a manual
moveChunk) gives it chunks.
Step 5: Shrink the Chunk Size & Watch the Distribution Change Optional standalone demo
Now fix the real reason shard3 is empty. The
chunk is the unit the balancer moves, and the default
chunkSize is 128 MB
— far larger than your whole 38 MB collection. Shrink the target chunk size for this
one collection and the data becomes movable in much smaller pieces.
orders collection re-chunked (more, smaller chunks), so
chunk counts in later output will differ from the rest of the tutorial. Parts 6–7
work fine either way.
use olist_sharded

// 1. BEFORE — what is the chunk size? (no chunkSize field = the
//    128 MB global default) and how many chunks exist?
db.getSiblingDB("config").collections.findOne({ _id: "olist_sharded.orders" })
db.getSiblingDB("config").chunks.countDocuments({ ns: "olist_sharded.orders" })   // 4

// 2. Shrink the target chunk size for THIS collection only: 128 MB -> 1 MB
db.adminCommand({
  configureCollectionBalancing: "olist_sharded.orders",
  chunkSize: 1
})

// 3. Confirm it took effect (chunkSize: 1)
db.adminCommand({ configureCollectionBalancing: "olist_sharded.orders" })

// 4. IMPORTANT: changing chunkSize does NOT re-split chunks that
//    already exist — a cluster only splits when it must migrate.
//    So split it yourself, at real document keys:
const IDS = db.orders.distinct("customer_id").slice(0, 6)
IDS.forEach(id => sh.splitFind("olist_sharded.orders", { customer_id: id }))
// (a "would be a duplicate" error just means that key was already a
//  boundary — harmless, carry on)

// 5. Chunks are now much smaller and far more numerous
db.getSiblingDB("config").chunks.countDocuments({ ns: "olist_sharded.orders" })
sh.status()With small movable chunks the balancer can finally do useful work — and a manual move is now cheap. Either wait for a balancing round, or move a chunk yourself:
// Pick a real chunk boundary to move. List the chunks with their
// min key, then hand one of them to shard3RS.
db.getSiblingDB("config").chunks
  .find({ ns: "olist_sharded.orders", shard: "shard1RS" }, { _id: 0, min: 1 })
  .toArray()

// Move the FIRST chunk of shard1RS over to shard3RS.
// (Use the exact `min` value printed above in place of MinKey.)
sh.moveChunk("olist_sharded.orders", MinKey, "shard3RS")

// Now the distribution finally shows all three shards
db.orders.getShardDistribution()

// Let the balancer keep working from here on
sh.startBalancer()
sh.isBalancerRunning()// chunkSize: 0 removes the per-collection override and goes
// back to the global default (128 MB).
db.adminCommand({
configureCollectionBalancing: "olist_sharded.orders",
chunkSize: 0
})
db.adminCommand({ configureCollectionBalancing: "olist_sharded.orders" })Part 6: Query Routing & Why the Shard Key Matters
The router is smart: if your query includes the shard key, it forwards the query to only
the shard that owns those values (targeted query). If it doesn't, it must
ask every shard in parallel and merge the results (scatter-gather).
Use explain() to see
the difference.
Open the MongoDB shell on the router first — then run the queries inside it:
docker compose -f docker-compose.sharded.yml exec mongos mongosh --port 27017
Step 1:
Find a customer_id to Query With
You cannot query by an ID you have not seen. Get real ones out of the data first — then every example below reuses one, so the results are reproducible:
use olist_sharded

// 1. distinct() — every distinct customer_id, deduped by the router.
//    No shard key in the filter, so this asks ALL shards and merges.
db.orders.distinct("customer_id")          // ~96,000 long array

// 2. Just a handful: .slice() keeps the output readable
db.orders.distinct("customer_id").slice(0, 5)

// 3. Grouping instead — the same idea, and $group collapses the
//    duplicates per shard before the router merges them.
db.orders.aggregate([
  { $group: { _id: "$customer_id" } },
  { $limit: 5 }
])

// 4. Stash one in a variable so every later command reuses the
//    same value instead of hand-copying an id.
const CID = db.orders.distinct("customer_id")[0]
print("Using customer_id:", CID)          // e.g. 9ef432ebbd257384d...

// 5. Sanity check: how many orders does this customer have?
//    ($match on the shard key -> only ONE shard is contacted)
db.orders.countDocuments({ customer_id: CID })distinct() and
$group with no $match on
the shard key are scatter-gather operations — they run on every shard and the
router merges the partial results. Using CID afterwards
is what makes the queries cheap.
Step 2: Targeted Query (Includes the Shard Key)
use olist_sharded

// TARGETED: filter on customer_id (the shard key).
// Look for "shards" in the output — only ONE shard is contacted.
db.orders.find({ customer_id: CID })
  .explain("executionStats")

// SCATTER-GATHER: filter on a non-shard-key field.
// "shards" now lists EVERY shard in the cluster.
db.orders.find({ order_status: "delivered" })
  .explain("executionStats")

// Aggregations route the same way — shard key in $match
// means only relevant shards run the pipeline:
db.orders.aggregate([
  { $match: { customer_id: CID } },          // same shard key -> 1 shard
  { $group: { _id: "$order_status", n: { $sum: 1 } } }
]).explain()In the targeted plan you'll see something like shards: { shard1RS: {...} } —
one entry. The scatter-gather plan lists all shards. Compare the executionTimeMillis of both to
feel the cost of skipping the shard key.
Targeted — query has the shard key
mongos
shard1RS
shard2RS
not contacted
The router hashes
customer_id, finds the owning chunk, sends the
query to one shard only.
Scatter-gather — no shard key
mongos
shard1RS
shard2RS
No shard key means no way to know the owner, so the router queries every shard in parallel and merges the results.
Step 3: CRUD Through the Router: Same API, Sharded Behind It
The point of a router is that your code never
changes. Every command you used in Tutorials 2–3 works here — the only
difference is that the mongos layer now decides which shard
executes each one. Run these in mongosh on the router.
CID from Step 1 is
still in scope for every command below.
Create — you never name a shard
use olist_sharded

// 1. One insert. You did NOT say which shard should store it —
//    the router hashes customer_id and picks the owning shard.
db.orders.insertOne({
  order_id: "lab-0001",
  customer_id: "c-demo-0001",
  order_status: "created",
  order_total: 129.9
})

// 2. Bulk insert of 4 more. Each customer_id hashes independently,
//    so these 4 documents are most likely split across BOTH shards.
db.orders.insertMany([
  { order_id: "lab-0002", customer_id: "c-demo-0002", order_status: "created" },
  { order_id: "lab-0003", customer_id: "c-demo-0003", order_status: "shipped" },
  { order_id: "lab-0004", customer_id: "c-demo-0004", order_status: "shipped" },
  { order_id: "lab-0005", customer_id: "c-demo-0005", order_status: "delivered" }
])

// 3. How many did we just add? 99,441 -> 99,446
db.orders.countDocuments({ order_id: /^lab-/ }) // 5Read — the same query, two very different costs
// A. Filter on the SHARD KEY -> targeted, 1 shard.
//    CID is the customer_id you discovered in the step above.
db.orders.find({ customer_id: CID })
  .explain().queryPlanner.winningPlan.shards
// -> { shard1RS: {...} }   (one entry only)

// A2. The same customer's full order history, projected and sorted
db.orders.find({ customer_id: CID },
               { _id: 0, order_id: 1, order_status: 1, order_total: 1 })
  .sort({ order_id: 1 })

// B. Filter on a NON-shard-key field -> scatter-gather, every shard
db.orders.find({ order_id: "lab-0003" })
  .explain().queryPlanner.winningPlan.shards
// -> { shard1RS: {...}, shard2RS: {...} }

// C. Empty filter / counts -> always every shard
db.orders.countDocuments({})                 // 99,446
db.orders.distinct("order_status")            // ask all shards, merge + dedupe

// D. Same trick inside an aggregation: a $match on the shard key
//    prunes shards BEFORE the pipeline runs, so $group/$sort only
//    execute on the one shard that matters.
db.orders.aggregate([
  { $match: { customer_id: CID } },               // <- prunes to 1 shard
  { $group:   { _id: "$order_status", n: { $sum: 1 } } }
])

// D2. One-customer summary: order count and total spend
db.orders.aggregate([
  { $match: { customer_id: CID } },
  { $group: {
      _id: null,
      orders: { $sum: 1 },
      spent:  { $sum: "$order_total" },
      statuses: { $addToSet: "$order_status" }
  } }
])

// E. Remove the $match shard key and the same pipeline fans out
//    to every shard, then mongos merges partial results.
db.orders.aggregate([
  { $match: { order_status: "shipped" } },       // <- no pruning
  { $group:   { _id: "$customer_id", n: { $sum: 1 } } }
])Update & Delete — and the one rule you cannot break
// 1. Targeted update: the filter carries the shard key, so the
//    router forwards the write to exactly one shard.
db.orders.updateOne(
  { customer_id: "c-demo-0001" },
  { $set: { order_status: "paid" } }
)

// 2. Scatter-gather update: no shard key in the filter, so EVERY
//    shard is asked to look for that document.
db.orders.updateMany(
  { order_status: "shipped" },
  { $set: { shipment_flag: true } }
)

// 3. Updating the SHARD KEY ITSELF. Since MongoDB 4.2 this is
//    ALLOWED, provided the filter pins the full shard key with an
//    equality match (and, for a non-null value, that the write runs
//    in a transaction or as a retryable write — mongosh uses
//    retryable writes by default, so this just works).
db.orders.updateOne(
  { customer_id: "c-demo-0001" },              // <- equality on the FULL shard key
  { $set: { customer_id: "c-demo-9999" } }
)
// -> { acknowledged: true, matchedCount: 1, modifiedCount: 1 }

//    THE CATCH: the document did NOT move. It is still physically on
//    the shard that held "c-demo-0001", but the config server now maps
//    "c-demo-9999" to the chunk owned by a DIFFERENT shard. Until the
//    balancer migrates it, a targeted query on the new key can come
//    back empty. Run this and watch:
//      db.orders.find({ customer_id: "c-demo-9999" })
db.orders.countDocuments({ customer_id: "c-demo-9999" })   // 0, or the doc if both keys hash to the same shard

//    The reliable way to MOVE a document: delete it and re-insert it.
//    The router then routes the insert to the correct shard itself.
db.orders.deleteOne({ customer_id: "c-demo-9999" })
db.orders.insertOne({ order_id: "lab-0001", customer_id: "c-demo-0001",
                      order_status: "paid", order_total: 129.9 })

// 4. Targeted delete (shard key present) vs scatter-gather delete
db.orders.deleteOne({ customer_id: "c-demo-0005" })   // 1 shard
db.orders.deleteMany({ order_status: "created" }) // every shard| Operation | Shard key in filter? | Shards contacted |
|---|---|---|
| insertOne / insertMany | n/a — router hashes the new value | Exactly 1 per document (a bulk insert can touch many) |
| find({ customer_id }) | Yes | 1 — targeted |
| updateOne / deleteOne on the key | Yes | 1 — targeted |
| aggregate with $match on the key | Yes | 1 — shards pruned before the pipeline runs |
| find({ order_status }) | No | All — scatter-gather |
| find({}) / countDocuments({}) | No | All |
| distinct() / updateMany / deleteMany | No | All — then merged on the router |
$set on customer_id(since MongoDB 4.2) |
Equality match on the full key required | 1 — but the document does not move; the balancer migrates it later |
// Remove everything this sub-section added, so later
// exercises and the verification checklist see the original
// 99,441 documents again.
db.orders.deleteMany({ order_id: /^lab-/ })
db.orders.countDocuments() // 99,441 — back to the imported totalImmutableField, code
66.)
Design Lesson: Shard Key Selection Trade-offs
- Query on the shard key whenever possible — the router contacts one shard only.
- Hashed keys even out writes but force range scans to touch every shard.
- Ranged keys help range queries but hot-spot if values are monotonic (timestamps, auto-increment IDs).
- Compound keys (e.g.
{ customer_id: 1, order_status: 1 }) support multi-field queries — prefix rules apply, just like compound indexes.
Practice Exercises: Sharded Cluster
Complete these exercises on your running sharded cluster to cement the concepts.
Exercise 1: Cluster Inventory
Task: List every shard in the cluster and the number of chunks each one holds.
Exercise 2: Verify Data Split
Task: Confirm the orders collection is truly split by connecting directly to shard1 and shard2 and counting documents on each.
Exercise 3: Targeted vs Scatter-Gather
Task: Run
two explain() plans —
one filtering on customer_id, one on order_status — and count
how many shards appear in each plan's shards section.
Exercise 4: Shard Another Collection
Task:
Import the Olist customers CSV into olist_sharded.customers
and shard it on a hashed customer_unique_id.
Note: customer_id — not customer_unique_id — is
fully unique, which is why this exercise asks for the unique variant: hashed
keys tolerate duplicate values across chunks. Verify the result with db.customers.getShardDistribution().
Exercise 5: Kill a Shard (Chaos Engineering)
Task: Stop
shard2, then query by customer_id through the
router. Observe which queries fail and why — then bring the shard back and watch the
cluster recover.
Moral: in production each shard is a multi-node replica set, so stopping one member fails over instead of taking the shard down. Our single-node shard sets make this failure visible on purpose.
docker compose -f docker-compose.sharded.yml down -v (add docker rm -f shard3 if you did Exercise scaling) and restart
the standalone stack with docker compose up -d.
Tutorial Verification Checklist
Run these checks to confirm your sharded cluster is healthy and data is distributed.
db.adminCommand({ listShards: 1 })
Lists shard1RS and shard2RS (plus shard3RS if you scaled out)
use olist_sharded; db.orders.stats().sharded
Returns true
db.orders.getShardDistribution()
Documents reported on every shard; totals ~99,441
db.orders.find({ customer_id: "..." }).explain()
Winning plan's shards section contains exactly one shard
Troubleshooting Common Issues
Quick Reference
The compose file you create in Part 2 and the everyday sharding commands, in one place.
# Tutorial 4: MongoDB Sharded Cluster for local labs
# 1 config server replica set + 2 shard replica sets + 1 mongos router.
# NOTE: single-node replica sets are fine for learning, never for production.
#
# docker compose -f docker-compose.sharded.yml up -d
#
services:
# ---- Config Server Replica Set (cluster metadata) ----
cfg:
image: mongo:7
container_name: cfg
restart: unless-stopped
command: ["mongod", "--configsvr", "--replSet", "cfgRS", "--port", "27019", "--bind_ip_all"]
ports:
- "27019:27019"
volumes:
- cfg_data:/data/db
# ---- Shard 1 Replica Set ----
shard1:
image: mongo:7
container_name: shard1
restart: unless-stopped
command: ["mongod", "--shardsvr", "--replSet", "shard1RS", "--port", "27018", "--bind_ip_all"]
ports:
- "27101:27018"
volumes:
- shard1_data:/data/db
# ---- Shard 2 Replica Set ----
shard2:
image: mongo:7
container_name: shard2
restart: unless-stopped
command: ["mongod", "--shardsvr", "--replSet", "shard2RS", "--port", "27018", "--bind_ip_all"]
ports:
- "27102:27018"
volumes:
- shard2_data:/data/db
# ---- Router (mongos) ----
mongos:
image: mongo:7
container_name: mongos
restart: unless-stopped
command: ["mongos", "--configdb", "cfgRS/cfg:27019", "--port", "27017", "--bind_ip_all"]
ports:
- "27025:27017"
depends_on:
- cfg
- shard1
- shard2
volumes:
cfg_data:
shard1_data:
shard2_data:
// Cluster overview — shards, databases, chunk distribution
sh.status()

// List shards programmatically
db.adminCommand({ listShards: 1 })

// Add / remove a shard
sh.addShard("shard1RS/shard1:27018")
db.adminCommand({ removeShard: "shard1RS" })  // drains chunks first

// Shard a database and a collection
sh.enableSharding("olist_sharded")
db.orders.createIndex({ customer_id: "hashed" })
sh.shardCollection("olist_sharded.orders", { customer_id: "hashed" })

// Data placement
db.orders.getShardDistribution()

// Balancer control
sh.isBalancerRunning()
sh.startBalancer()
sh.stopBalancer()

// Explain — targeted (1 shard) vs scatter-gather (all shards)
db.orders.find({ customer_id: "..." }).explain()# Stop the cluster and delete its volumes (-v = remove data too)
docker rm -f shard3 2>/dev/null # if you added the extra shard
docker compose -f docker-compose.sharded.yml down -v
# Bring back the standalone stack from Tutorials 1-3
docker compose up -dCurious about distributed computation instead of storage? Try the MapReduce & PySpark track.