Quick Concept: MongoDB Return Types
Different MongoDB methods return different things. Understanding this prevents confusion when building aggregation pipelines.
Pipeline Mental Model
Input documents        Each stage transforms the document stream
      ↓
  ┌────────┐
  │ $match │  →  filters documents
  └────────┘
      ↓
  ┌────────┐
  │$lookup │  →  adds joined data
  └────────┘
      ↓
  ┌─────────┐
  │ $unwind │  →  expands arrays into separate docs
  └─────────┘
      ↓
  ┌─────────┐
  │ $group  │  →  reduces into grouped docs
  └─────────┘
      ↓
  aggregate()  →  returns a Cursor over final results
Why Placement
Matters: $sort Inside vs. Outside
.sort() on the cursor and
$sort inside the pipeline
can produce completely different results when combined with
$limit.
$sort INSIDE aggregate
db.orders.aggregate([
  { $sort: { order_purchase_timestamp: -1 } },
  { $limit: 10 }
])
Effect: Sorts all documents, then takes the
top 10.
Result: The 10 most recent orders overall.
.sort() OUTSIDE aggregate
db.orders.aggregate([
  { $limit: 10 }
]).sort({ order_purchase_timestamp: -1 })
Effect: Takes the first 10 documents (arbitrary
order), then sorts only those 10.
Result: Likely wrong — you wanted the 10 most
recent, not a random 10 sorted.
$limit, $group, or $setWindowFields), use $sort
inside the pipeline. Use .sort() on the cursor only
when ordering the final output.
Part 1: Load the Olist E-Commerce Dataset
The Olist Brazilian E-Commerce dataset contains approximately 100,000 real anonymized orders with customers, products, sellers, payments, freight, and reviews.
Step 1: Download the Dataset
The dataset files are located in your project directory:
data/olist_dataset/
├── olist_customers_dataset.csv
├── olist_orders_dataset.csv
├── olist_order_items_dataset.csv
├── olist_order_payments_dataset.csv
├── olist_order_reviews_dataset.csv
├── olist_products_dataset.csv
├── olist_sellers_dataset.csv
└── olist_geolocation_dataset.csv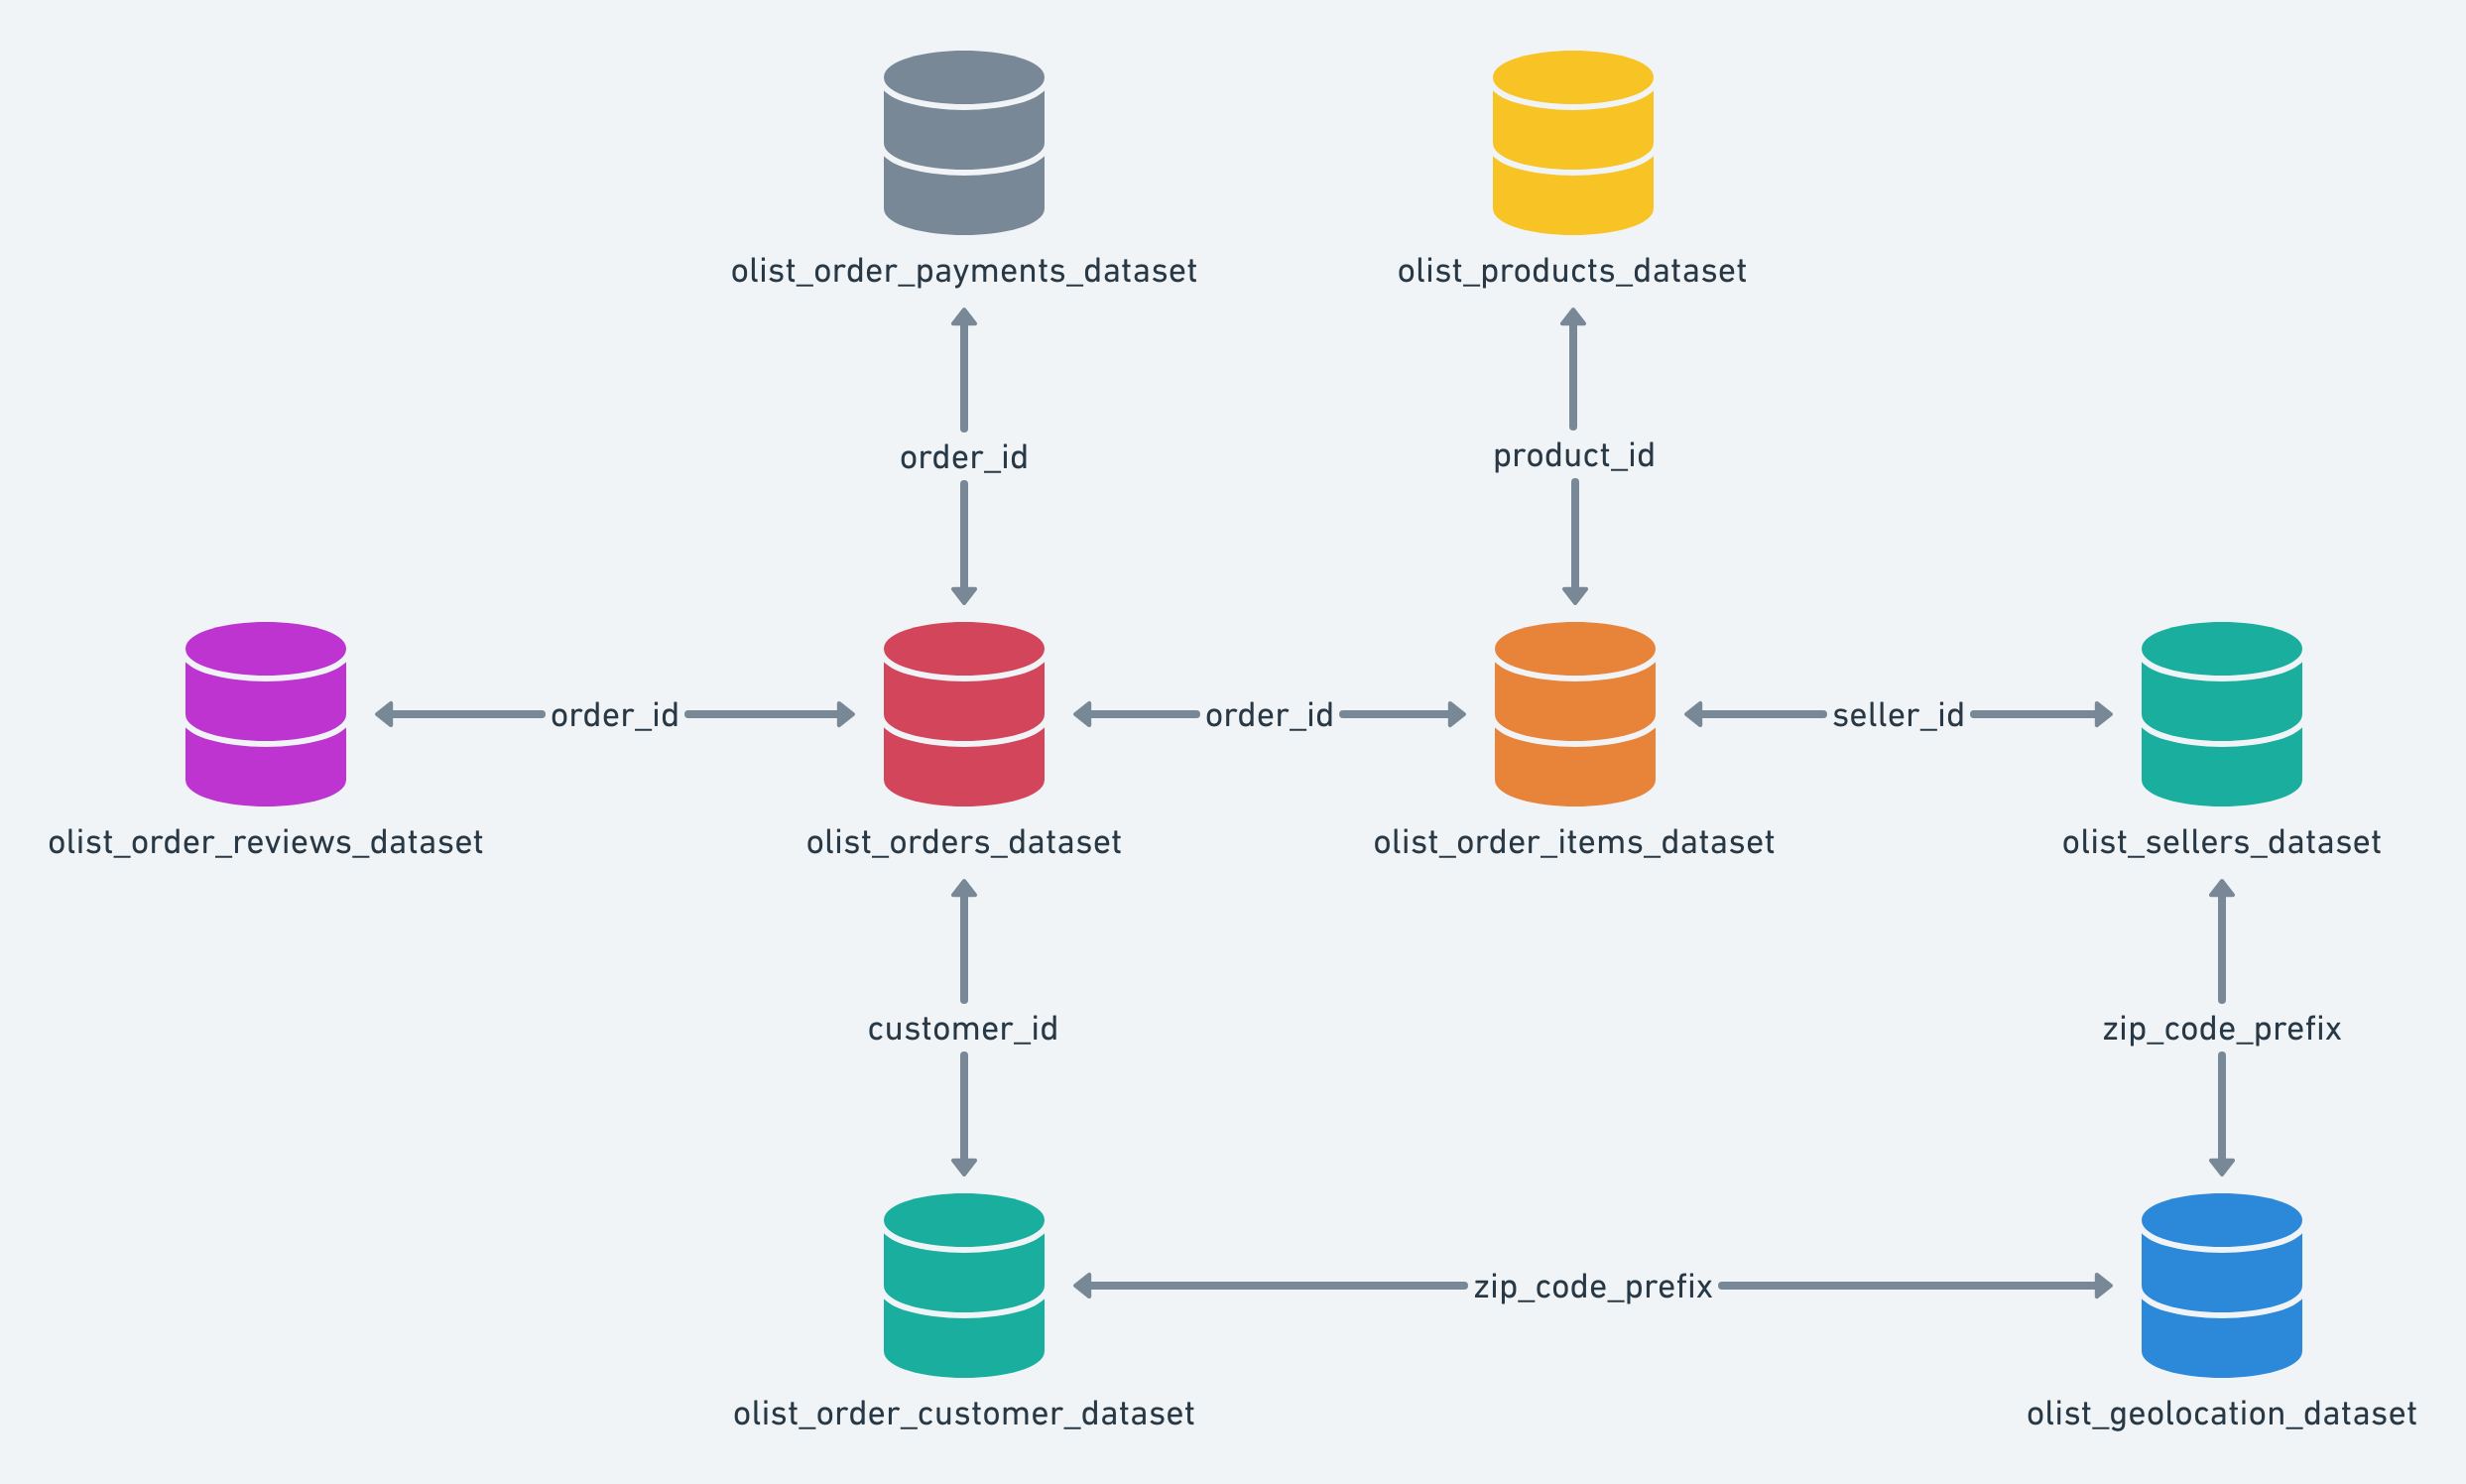
Step 2: Copy Files to MongoDB Container
# Copy all CSV files to the container
docker cp data/olist_dataset/ mongodb:/tmp/olist/Step 3: Import Each Collection
# Import customers
docker exec -i mongodb mongoimport \
  --db olist_ecommerce \
  --collection customers \
  --type csv --headerline \
  --file /tmp/olist/olist_customers_dataset.csv \
  --username admin \
  --password password \
  --authenticationDatabase admin

# Import orders
docker exec -i mongodb mongoimport \
  --db olist_ecommerce \
  --collection orders \
  --type csv --headerline \
  --file /tmp/olist/olist_orders_dataset.csv \
  --username admin \
  --password password \
  --authenticationDatabase admin

# Import order items
docker exec -i mongodb mongoimport \
  --db olist_ecommerce \
  --collection order_items \
  --type csv --headerline \
  --file /tmp/olist/olist_order_items_dataset.csv \
  --username admin \
  --password password \
  --authenticationDatabase admin

# Import order payments
docker exec -i mongodb mongoimport \
  --db olist_ecommerce \
  --collection order_payments \
  --type csv --headerline \
  --file /tmp/olist/olist_order_payments_dataset.csv \
  --username admin \
  --password password \
  --authenticationDatabase admin

# Import order reviews
docker exec -i mongodb mongoimport \
  --db olist_ecommerce \
  --collection order_reviews \
  --type csv --headerline \
  --file /tmp/olist/olist_order_reviews_dataset.csv \
  --username admin \
  --password password \
  --authenticationDatabase admin

# Import products
docker exec -i mongodb mongoimport \
  --db olist_ecommerce \
  --collection products \
  --type csv --headerline \
  --file /tmp/olist/olist_products_dataset.csv \
  --username admin \
  --password password \
--authenticationDatabase adminStep 4: Verify Import
// Connect to MongoDB
docker exec -it mongodb mongosh

// Authenticate
use admin
db.auth("admin", "password")

// Switch to olist database
use olist_ecommerce

// Check document counts
db.customers.countDocuments()
db.orders.countDocuments()
db.order_items.countDocuments()
db.order_payments.countDocuments()
db.order_reviews.countDocuments()
db.products.countDocuments()Advanced Feature 1: Working with Nested Documents
The Olist data is imported as flat CSV files, so each collection has its own fields.
Customer data lives in the customers collection, while orders live in
orders. We can still use dot notation to query
fields within each collection directly.
orders collection has a customer_id field that references the customers collection — it does not contain a
nested customer object. We'll learn to join them with $lookup in Step 4.
Actual Document Structure (After CSV Import)
{
  _id: ObjectId("6a93b0551695f57aa60ab3f1"),
  order_id: "e481f51cbdc54678b7cc49136f2d6af7",
  customer_id: "9ef432eb6251297304e76186b10a928d",
  order_status: "delivered",
  order_purchase_timestamp: "2017-10-02 10:56:33",
  order_approved_at: "2017-10-02 11:07:15",
  order_delivered_carrier_date: "2017-10-04 19:55:00",
  order_delivered_customer_date: "2017-10-10 21:25:13",
  order_estimated_delivery_date: "2017-10-18 00:00:00"
}
Notice: customer_id is a reference string, not a nested object.
The actual customer details (customer_city, customer_state) live in the customers collection.
Querying Fields (Dot Notation)
Dot notation works on fields within a single document. Since customer data lives in the customers collection, we query it there directly:
// Find customers from Sao Paulo (query the customers collection)
db.customers.find({ customer_city: "Sao Paulo" })

// Find customers from SP state
db.customers.find({ customer_state: "SP" })

// Find order items with freight value greater than 10
db.order_items.find({ freight_value: { $gt: 10 } })$lookup in Step 4, we can join customer data into each
order and then use dot notation like "customer_info.customer_city".
Updating Fields
// Update a customer's city in the customers collection
db.customers.updateOne(
  { customer_id: "9ef432eb6251297304e76186b10a928d" },
  { $set: { customer_city: "Sao Paulo - Updated" } }
)customer_city) when querying fields that exist in the
document. Use dot notation (e.g., "order_items.price") for fields inside embedded arrays or
subdocuments.
Advanced Feature 2: Embedding vs Referencing
& $lookup
This is a critical MongoDB schema design decision. Understanding embedding vs referencing determines how you query and join data.
Embedded Documents
What is embedding? Storing related data within the same document.
{
  order_id: "00e0e50c...",
  customer: {
    customer_id: "a6c8e...",
    customer_city: "Sao Paulo",
    customer_state: "SP"
  },
  // ... other fields
}When to embed:
- Data is accessed together frequently
- Data has a 1:1 or 1:few relationship
- Data doesn't grow unbounded
Referenced Documents
What is referencing? Storing related data in separate collections and linking them.
// Order document with reference
{
  order_id: "00e0e50c...",
  customer_id: "a6c8e...",
  // ... other fields
}

// Separate customer document
{
  customer_id: "a6c8e...",
  customer_city: "Sao Paulo",
  customer_state: "SP"
}When to reference:
- Data is accessed independently
- Data has a many:many relationship
- Data grows unbounded (e.g., product reviews)
Joining Data with $lookup
// Join orders with customer data
db.orders.aggregate([
  {
    $lookup: {
      from: "customers",
      localField: "customer_id",
      foreignField: "customer_id",
      as: "customer_info"
    }
  },
  { $unwind: "$customer_info" },
  {
    $project: {
      order_id: 1,
      order_status: 1,
      "customer_info.customer_city": 1,
      "customer_info.customer_state": 1
    }
  },
  { $limit: 5 }
])Practice: Embedding vs Referencing Decision
Consider these scenarios:
- Order items within an order — Embed — Usually accessed with the order
- Product reviews for a product — Reference — Can grow large/unbounded
- Customer info for an order — Embed — Usually needed when viewing the order
- Payment installments for an order — Embed — Usually 1:few and belongs to the order
Advanced Feature 3: Working with Arrays
Now that we understand $lookup, we can join data and then work with
the resulting arrays using operators like $elemMatch, $size and $unwind.
order_id so the
$lookup joins below use the index instead of scanning
every document (otherwise the pipelines take minutes).
// Speed up $lookup joins on order_id
db.orders.createIndex({ order_id: 1 })
db.order_items.createIndex({ order_id: 1 })
Using $elemMatch for Complex Array Queries
// Find orders with items that have price > 100 AND freight > 10

db.orders.aggregate([
  {
    $lookup: {
      from: "order_items",
      localField: "order_id",
      foreignField: "order_id",
      as: "order_items"
    }
  },
  {
    $match: {
      order_items: {
        $elemMatch: {
          price: { $gt: 100 },
          freight_value: { $gt: 10 }
        }
      }
    }
  }
])$elemMatch matters: Without it,
conditions could match different array elements. A plain query might return unexpected
results because it could match if ANY item has price > 100 and ANY item has freight
> 10 (not necessarily the same item).
Querying Array Length
// Count orders with more than 3 items
db.orders.aggregate([
  {
    $lookup: {
      from: "order_items",
      localField: "order_id",
      foreignField: "order_id",
      as: "order_items"
    }
  },
  {
    $addFields: {
      item_count: { $size: "$order_items" }
    }
  },
  { $match: { item_count: { $gt: 3 } } },
  { $count: "total" }
])
Unwinding Arrays with
$unwind
The $unwind stage explodes
array elements into separate documents:
// Analyze individual items across all orders
db.orders.aggregate([
  {
    $lookup: {
      from: "order_items",
      localField: "order_id",
      foreignField: "order_id",
      as: "order_items"
    }
  },
  { $unwind: "$order_items" },
  {
    $group: {
      _id: "$order_items.product_id",
      total_quantity: { $sum: 1 },
      avg_price: { $avg: "$order_items.price" }
    }
  },
  { $sort: { total_quantity: -1 } },
  { $limit: 10 }
])Advanced Feature 4: Advanced Aggregation Pipelines
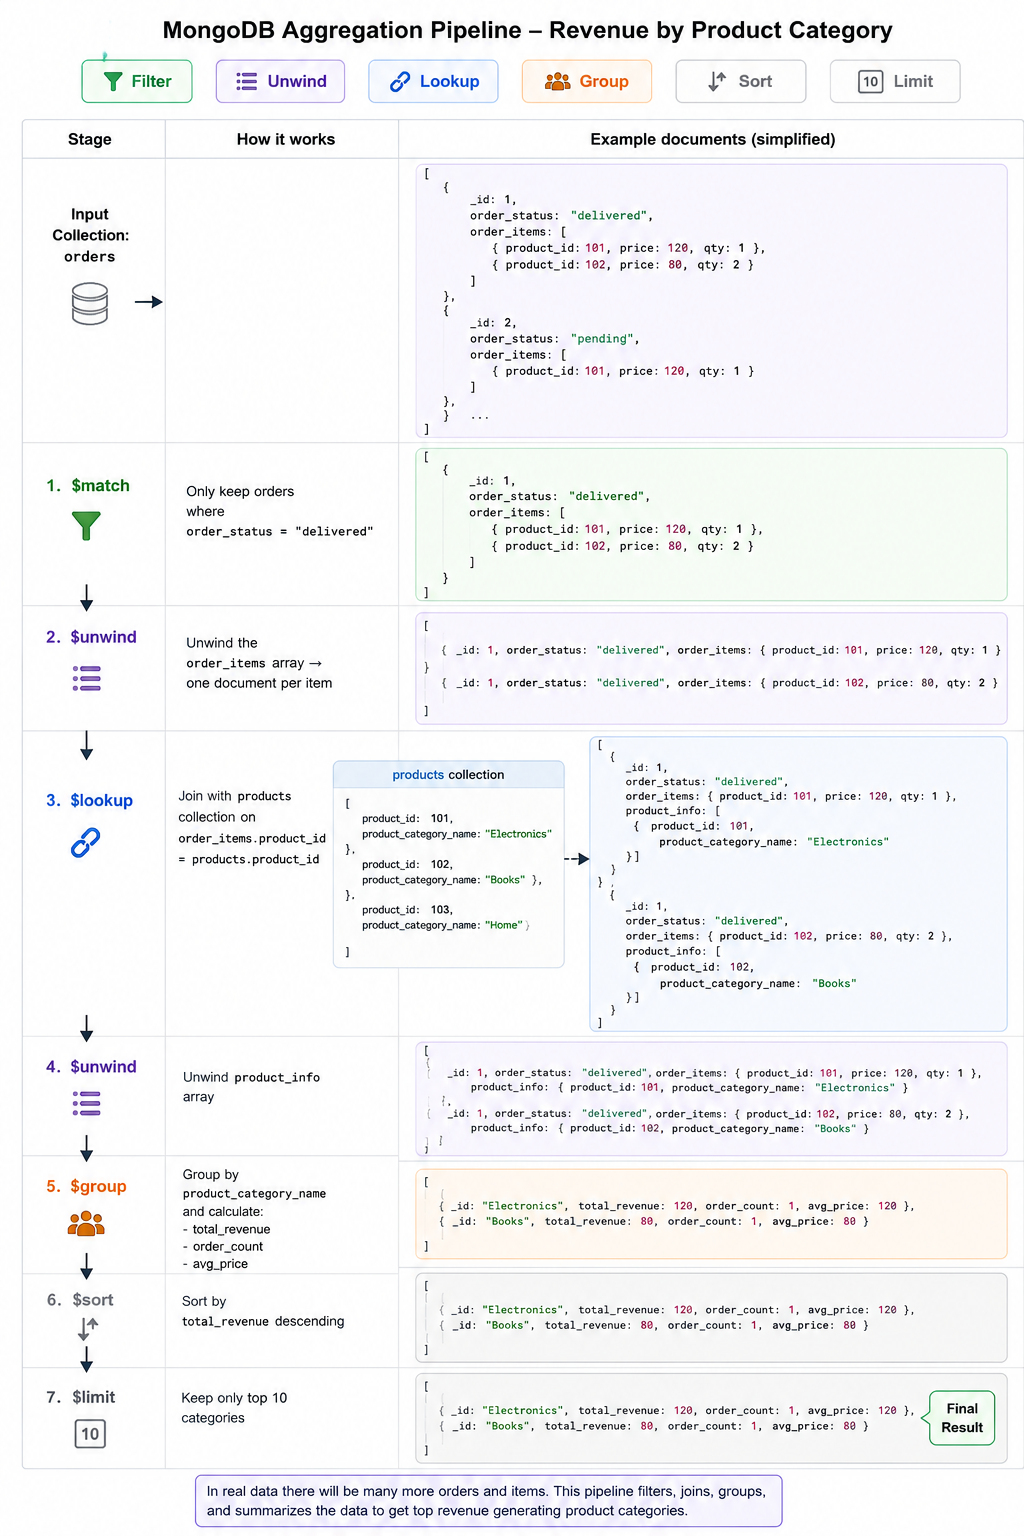
Multi-Stage Pipelines
Chain many stages together — each stage feeds its output into the next:
// Revenue analysis by product category
db.orders.aggregate([
  // Stage 1: Only delivered orders
  { $match: { order_status: "delivered" } },

  // Stage 2: Unwind items
  { $unwind: "$order_items" },

  // Stage 3: Join with products
  {
    $lookup: {
      from: "products",
      localField: "order_items.product_id",
      foreignField: "product_id",
      as: "product_info"
    }
  },

  // Stage 4: Unwind product info
  { $unwind: "$product_info" },

  // Stage 5: Group by category
  {
    $group: {
      _id: "$product_info.product_category_name",
      total_revenue: { $sum: "$order_items.price" },
      order_count: { $sum: 1 },
      avg_price: { $avg: "$order_items.price" }
    }
  },

  // Stage 6: Sort by revenue
  { $sort: { total_revenue: -1 } },

  // Stage 7: Top 10 categories
  { $limit: 10 }
])
Using $project for Data Shaping
// Create a summary report with calculated fields
db.orders.aggregate([
  { $match: { order_status: "delivered" } },
  {
    $project: {
      order_id: 1,
      year: { $year: "$order_purchase_timestamp" },
      month: { $month: "$order_purchase_timestamp" },
      total_items: { $size: "$order_items" },
      has_multiple_items: {
        $gt: [{ $size: "$order_items" }, 1]
      }
    }
  },
  { $limit: 10 }
])
Using $addFields for Computed Fields
// Add calculated fields to existing documents
db.orders.aggregate([
  {
    $addFields: {
      total_freight: { $sum: "$order_items.freight_value" },
      avg_item_price: { $avg: "$order_items.price" },
      item_count: { $size: "$order_items" }
    }
  },
  {
    $project: {
      order_id: 1,
      total_freight: 1,
      avg_item_price: 1,
      item_count: 1
    }
  },
  { $limit: 5 }
])Part 2: Working with Amazon M2 Big Data Dataset
Now let's work with a genuinely large dataset to understand MongoDB's performance at scale.
Step 1: Copy the File
# Copy the CSV file to the container
docker cp data/amazon_m2_big_data.csv mongodb:/tmp/amazon_m2.csvStep 2: Import the Data
# Import Amazon M2 data
docker exec -i mongodb mongoimport \
  --db amazon_m2 \
  --collection shopping_sessions \
  --type csv --headerline \
  --file /tmp/amazon_m2.csv \
  --username admin \
  --password password \
--authenticationDatabase adminStep 3: Verify Import
// Connect to MongoDB
docker exec -it mongodb mongosh

// Authenticate
use admin
db.auth("admin", "password")

// Switch to amazon_m2 database
use amazon_m2

// Check document count
db.shopping_sessions.countDocuments()Exploring the Data Structure
// See a sample document
db.shopping_sessions.findOne()

// See the fields available
Object.keys(db.shopping_sessions.findOne())Practice Exercises: Amazon M2 Dataset
Complete these exercises to demonstrate your MongoDB skills with a large dataset.
Exercise 1: Basic Exploration
Task: Count the total number of shopping sessions in the dataset.
Exercise 2: Filtering
Task: Find all sessions where the user made a purchase.
Exercise 3: Sorting
Task: Find the 10 most expensive products viewed (sort by price descending).
Exercise 4: Multiple Conditions
Task: Find sessions from a specific locale (e.g., "us") where the price is greater than 100.
Exercise 5: Projection
Task: Show only the session_id, product_id, and price fields (exclude _id).
Exercise 6: Aggregation — Count by Locale
Task: Count how many sessions exist for each locale.
Exercise 7: Aggregation — Average Price
Task: Calculate the average price for each locale.
Exercise 8: Complex Aggregation
Task: Find the top 5 most viewed products (by session count) in the "us" locale.
Exercise 9: Date Analysis
Task: Analyze sessions by time of day (extract hour from timestamp and count sessions).
Exercise 10: Comprehensive Analysis
Task: Create a summary report showing for each locale: total sessions, average price, number of unique products, percentage of sessions with purchases.
Install MongoDB Compass to View Data Locally
What is MongoDB Compass? Compass is the official graphical interface for MongoDB. Instead of typing queries in the shell, you can visually explore collections, inspect documents, run queries, and even build aggregation pipelines with point-and-click controls.
Step 1: Download MongoDB Compass
Download the installer for your operating system from the official MongoDB website, then install it with your package manager:
Step 2: Install Compass
Ubuntu / Debian (install the downloaded .deb file):
# From the folder containing the downloaded .deb file
sudo apt install ./mongodb-compass_*.deb

# Launch Compass
mongodb-compassFedora / RHEL (install the downloaded .rpm file):
# From the folder containing the downloaded .rpm file
sudo dnf install mongodb-compass-*.rpm

# Launch Compass
mongodb-compassStep 3: Connect to Your MongoDB Container
Make sure your container is running (docker ps). On the Compass
home screen, paste this connection string and click Connect:
mongodb://admin:password@localhost:27017/?authSource=admin| Part | What It Means |
|---|---|
| mongodb:// | The standard MongoDB connection protocol |
| admin:password | Username and password we created in Tutorial 1's docker-compose.yml |
| localhost:27017 | Your machine's address and the default MongoDB port mapped by Docker to the container |
| ?authSource=admin | Tells Compass to authenticate against the admin database where the credentials
live |
olist_ecommerce, sample_supplies, and amazon_m2 — will appear in the left sidebar. Click any
collection to browse its documents visually.
Tutorial Verification Checklist
Run these integrity checks to confirm both datasets loaded and your pipelines execute correctly.
use olist_ecommerce; db.orders.countDocuments()
Returns ~100,000 order documents
use amazon_m2; db.shopping_sessions.countDocuments()
Returns millions of session documents
db.orders.aggregate([{ $lookup: { from: "customers", localField: "customer_id", foreignField: "customer_id", as: "c" } }, { $limit: 1 }])
Result document includes customer fields
db.orders.aggregate([{ $unwind: "$order_items" }, { $group: { _id: "$order_items.product_id", n: { $sum: 1 } } }, { $sort: { n: -1 } }, { $limit: 1 }])
Returns the most-sold product
Troubleshooting Common Issues
Quick Reference Commands
Bookmark these everyday utility commands for future lab assignments.
# Copy CSV folder into container
docker cp data/olist_dataset/ mongodb:/tmp/olist/

# Import a single CSV collection
docker exec -i mongodb mongoimport \
  --db olist_ecommerce \
  --collection orders \
  --type csv --headerline \
  --file /tmp/olist/olist_orders_dataset.csv \
  --username admin \
  --password password \
  --authenticationDatabase admin

# Verify a collection count
docker exec -it mongodb mongosh \
  -u admin -p password \
  --eval "use amazon_m2; db.shopping_sessions.countDocuments()" \
--authenticationDatabase admin// $match — filter early for performance
{ $match: { order_status: "delivered" } }
// $unwind — explode arrays into documents
{ $unwind: "$order_items" }
// $lookup — join with another collection
{
$lookup: {
from: "customers",
localField: "customer_id",
foreignField: "customer_id",
as: "customer_info"
}
}
// $addFields — compute new fields
{ $addFields: { item_count: { $size: "$order_items" } } }
// $project — shape output
{ $project: { order_id: 1, year: { $year: "$order_purchase_timestamp" } } }
// $group — aggregate
{
$group: {
_id: "$locale",
total_sessions: { $sum: 1 },
avg_price: { $avg: "$price" }
}
}
// Allow disk use for large pipelines
db.collection.aggregate([...], { allowDiskUse: true })